Backend Networking
🎯 Mục tiêu Task 4
Tạo Virtual Private Cloud (VPC) foundation cho hệ thống VinaShoes E-commerce với:
- VPC CIDR: 10.0.0.0/16 với DNS Hostnames & DNS Resolution
- Multi-AZ Subnets: 2 Public + 2 Private subnets across 2 AZs
- Internet Gateway: Kết nối internet cho public subnets
- Route Tables: Public route qua IGW, Private route sẵn sàng cho NAT Gateway
- Security Groups: Foundation cho ECS Fargate, NAT Gateway, và DB access
📋 Prerequisites từ Tasks trước:
- ✅ Task 1: Introduction và architecture overview
- ✅ Task 2: DNS setup với Cloudflare và ACM certificates
- ✅ Task 3: Frontend deployment với Amplify + CloudFront + WAF
Deployment Strategy:
- Public Subnets: Dành cho NAT Gateway (Task 5) và Load Balancers (Tasks sau)
- Private Subnets: Dành cho ECS Fargate containers (Task 8)
- Multi-AZ: High availability across ap-southeast-1a và ap-southeast-1b
- Reserved space: Để mở rộng tương lai (Database subnets, Cache tiers, etc.)
Các bước triển khai
4.1. Tạo VPC với DNS Features
🎯 Objective: Setup VPC foundation với proper DNS configuration qua AWS Console
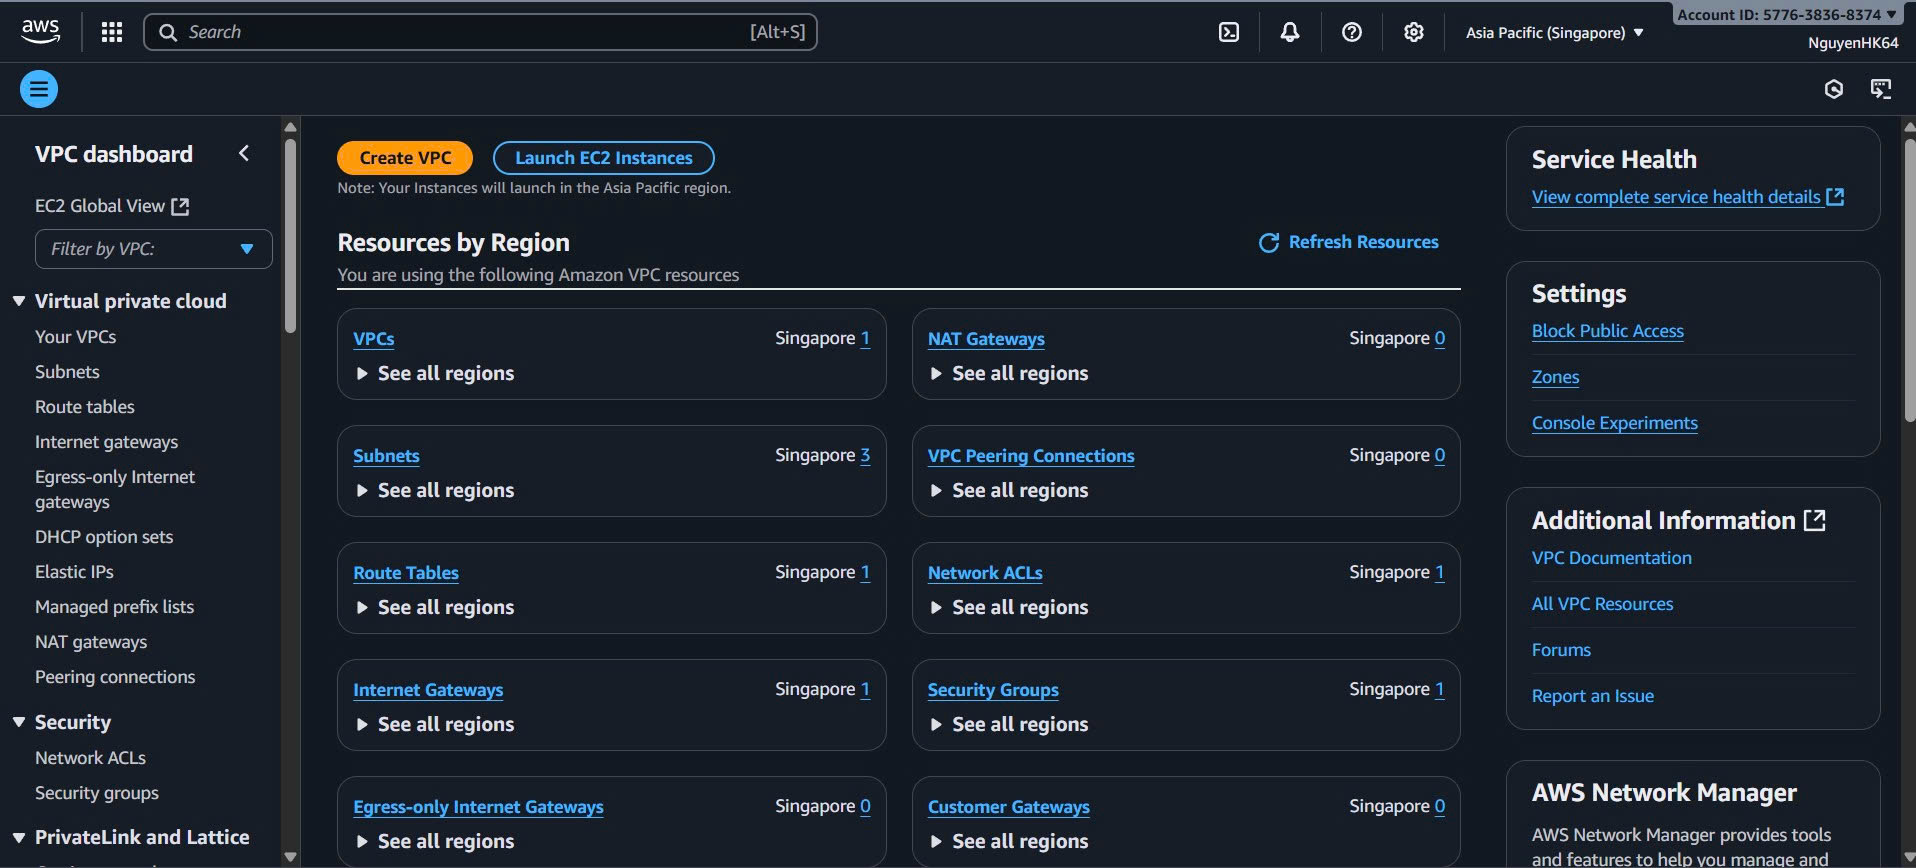
4.1.1. Create VPC using AWS Console
Console Steps:
- Truy cập VPC Console:
- Đăng nhập AWS Console → Services → VPC
- Chọn Region: Asia Pacific (Singapore) ap-southeast-1
- Click “Create VPC”
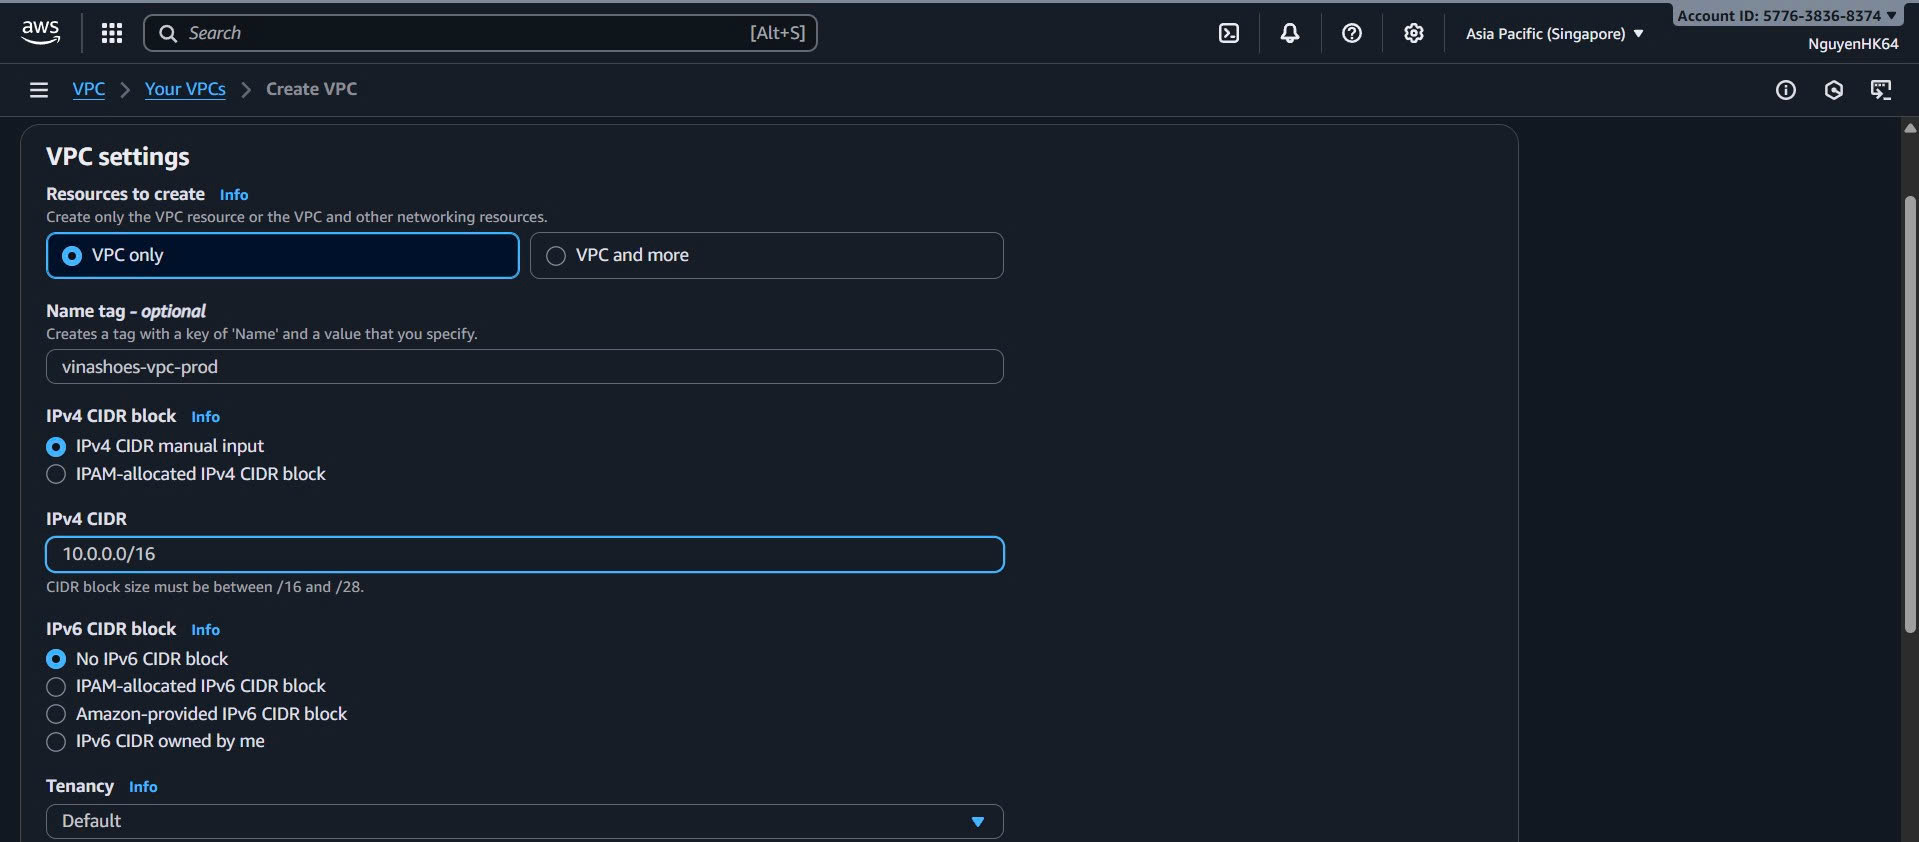
- Configure VPC Settings:
- Resources to create: VPC only
- Name tag:
vinashoes-vpc-prod - IPv4 CIDR block:
10.0.0.0/16 - IPv6 CIDR block: No IPv6 CIDR block
- Tenancy: Default
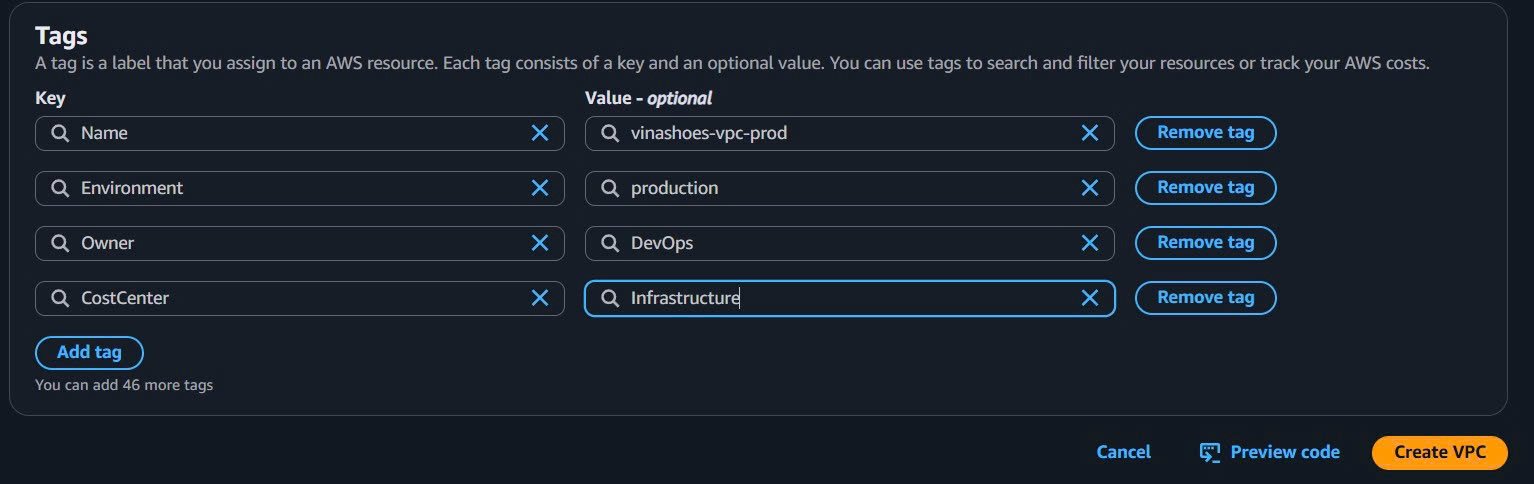
- Add Additional Tags:
- Environment:
production - Project:
VinaShoes - Owner:
DevOps - CostCenter:
Infrastructure - Click “Create VPC”
- Environment:
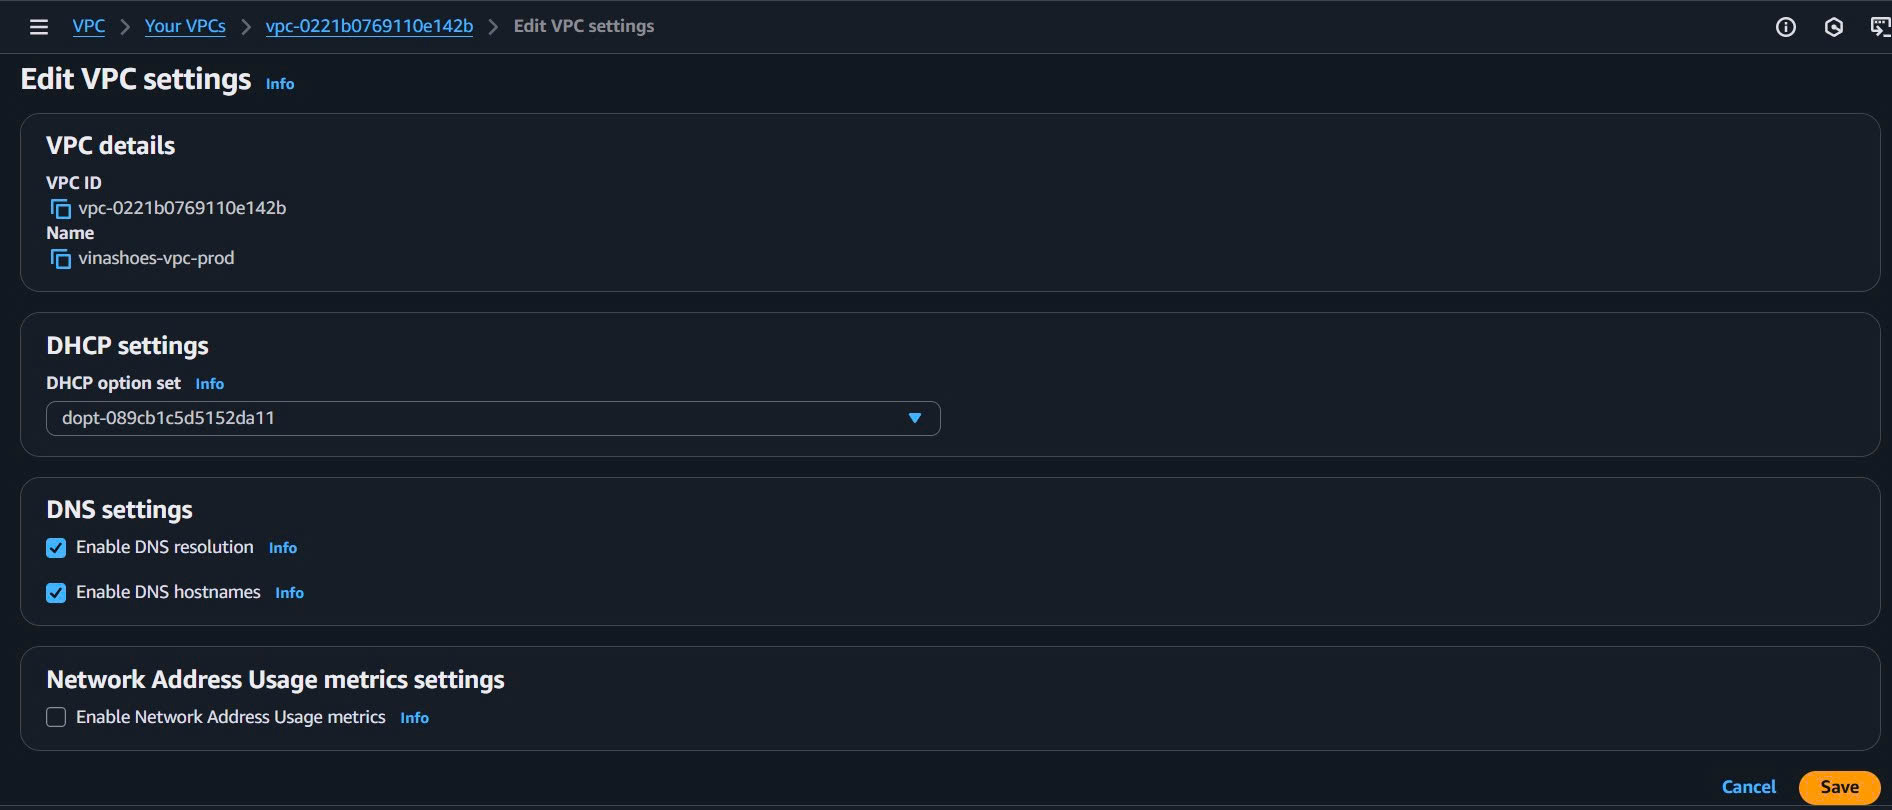
- Enable DNS Features:
- Sau khi VPC được tạo, chọn VPC vừa tạo
- Actions → Edit VPC settings
- ✅ Enable DNS resolution
- ✅ Enable DNS hostnames
- Save changes
CLI Alternative:
# Create VPC
aws ec2 create-vpc \
  --cidr-block 10.0.0.0/16 \
  --tag-specifications 'ResourceType=vpc,Tags=[{Key=Name,Value=vinashoes-vpc-prod},{Key=Environment,Value=production},{Key=Project,Value=VinaShoes}]'

# Save VPC ID
export VPC_ID=vpc-xxxxxxxxxxxxxxxxx

# Enable DNS features
aws ec2 modify-vpc-attribute --vpc-id $VPC_ID --enable-dns-hostnames
aws ec2 modify-vpc-attribute --vpc-id $VPC_ID --enable-dns-support
💡 Console vs CLI:
- Console: Dễ hình dung, có validation, visual feedback
- CLI: Nhanh hơn cho automation, scripting
- Best practice: Học console trước, sau đó dùng CLI cho automation
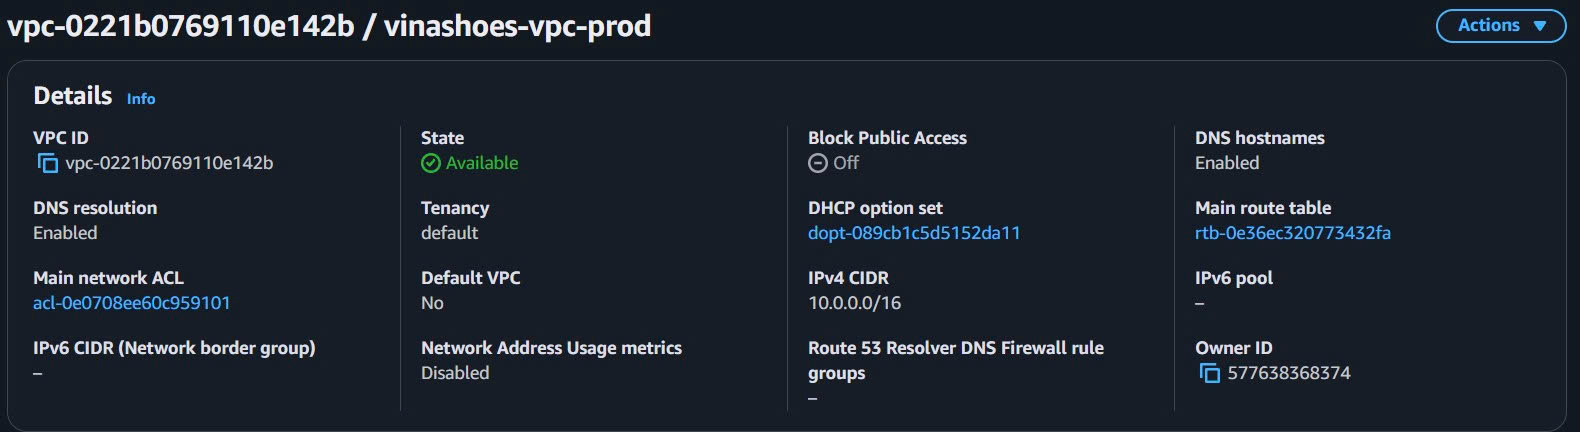
4.1.2. Verify VPC Configuration
Console Verification:
- VPC Dashboard Check:
- VPC Console → Your VPC → vinashoes-vpc-prod
- Check Details tab:
- State: Available ✅
- DNS resolution: Enabled ✅
- DNS hostnames: Enabled ✅
- CIDR: 10.0.0.0/16 ✅
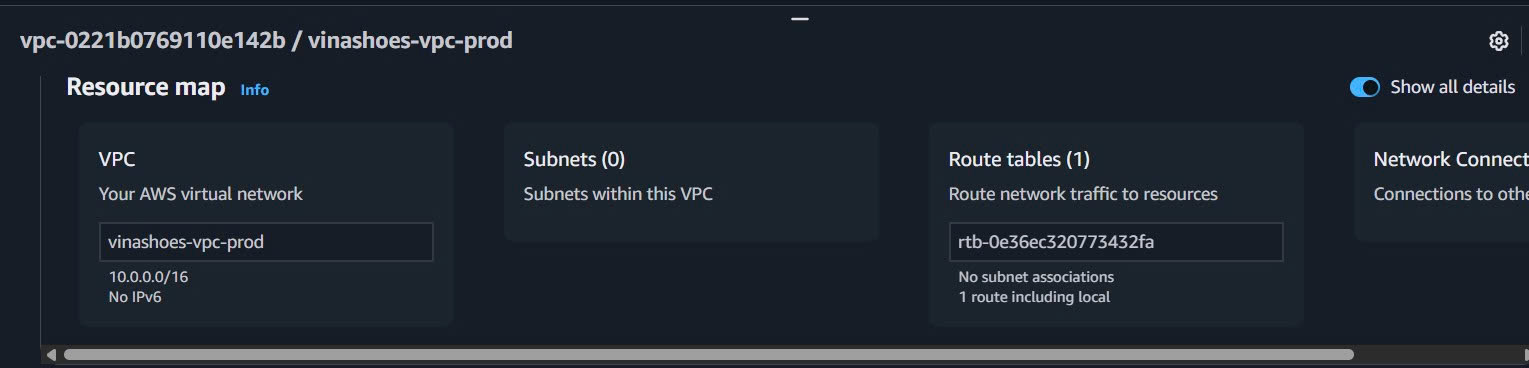
- Resource Overview:
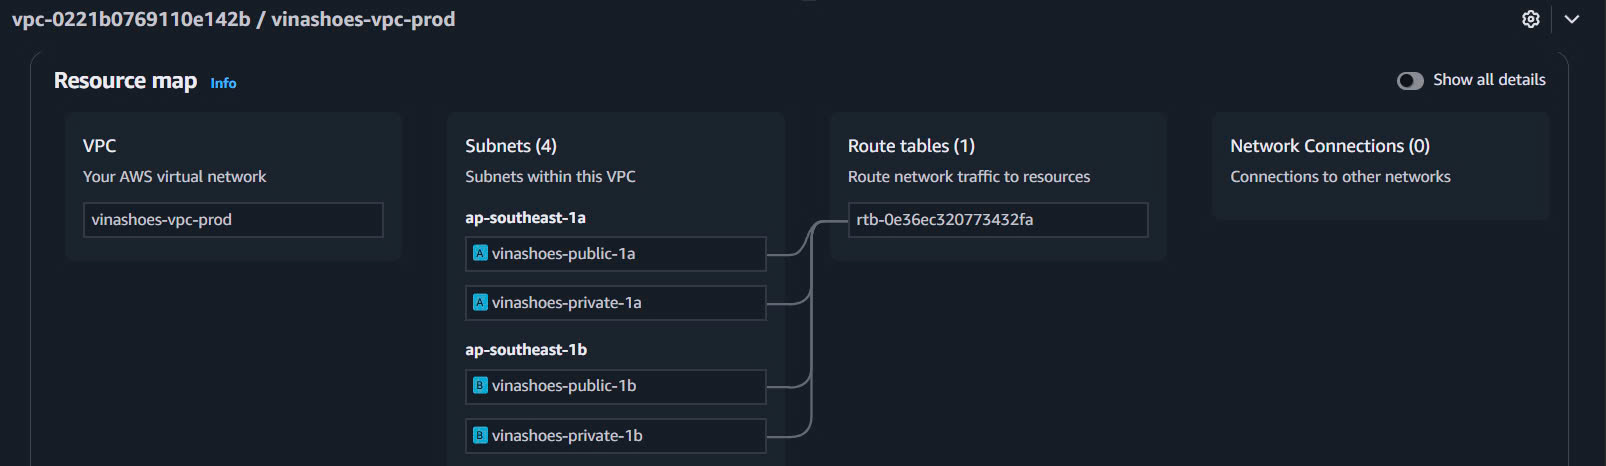
- VPC Dashboard → Resource map
- Confirm VPC được hiển thị với correct CIDR block
CLI Verification:
# Verify VPC configuration
aws ec2 describe-vpcs \
  --vpc-ids $VPC_ID \
  --query 'Vpcs[0].[VpcId,CidrBlock,DnsHostnames,DnsSupport,State]' \
  --output table

# Add additional tags if needed
aws ec2 create-tags \
  --resources $VPC_ID \
  --tags \
    Key=Backup,Value=Required \
    Key=ManagedBy,Value=DevOpsTeam
🎯 Deliverable 4.1: VPC created với DNS features enabled
- VPC ID:
vpc-xxxxxxxxxxxxxxxxx(save this for next steps) - State: Available
- DNS Resolution: Enabled
- DNS Hostnames: Enabled
4.2. Tạo Multi-AZ Subnets
🎯 Objective: Create 2 Public + 2 Private subnets across 2 AZs qua AWS Console
4.2.1. Tạo All Subnets via Console
Console Steps:
- Navigate to Subnets:
- VPC Console → Subnets → Create subnet
- Select VPC: vinashoes-vpc-prod

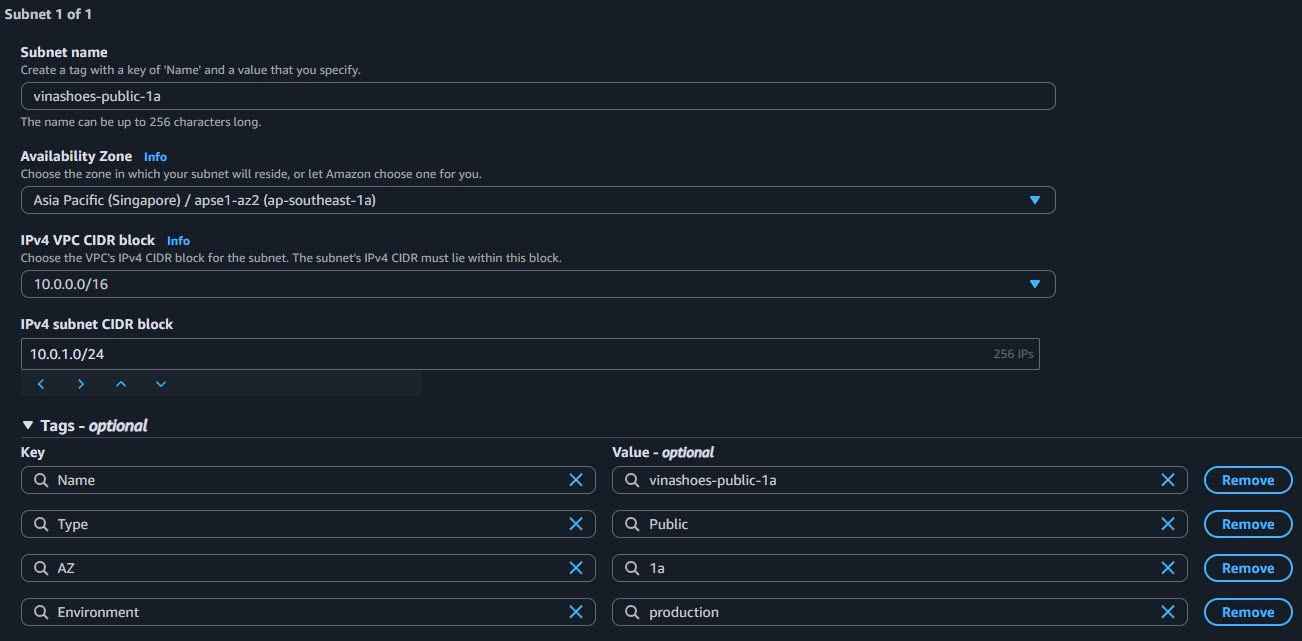
- Create Public Subnet 1a:
- Subnet name:
vinashoes-public-1a - Availability Zone: ap-southeast-1a
- IPv4 CIDR block:
10.0.1.0/24 - Add tags:
- Type:
Public - AZ:
1a - Environment:
production
- Type:
- Subnet name:
- Add More Subnets in Same Wizard:
- Click “Add new subnet” để continue
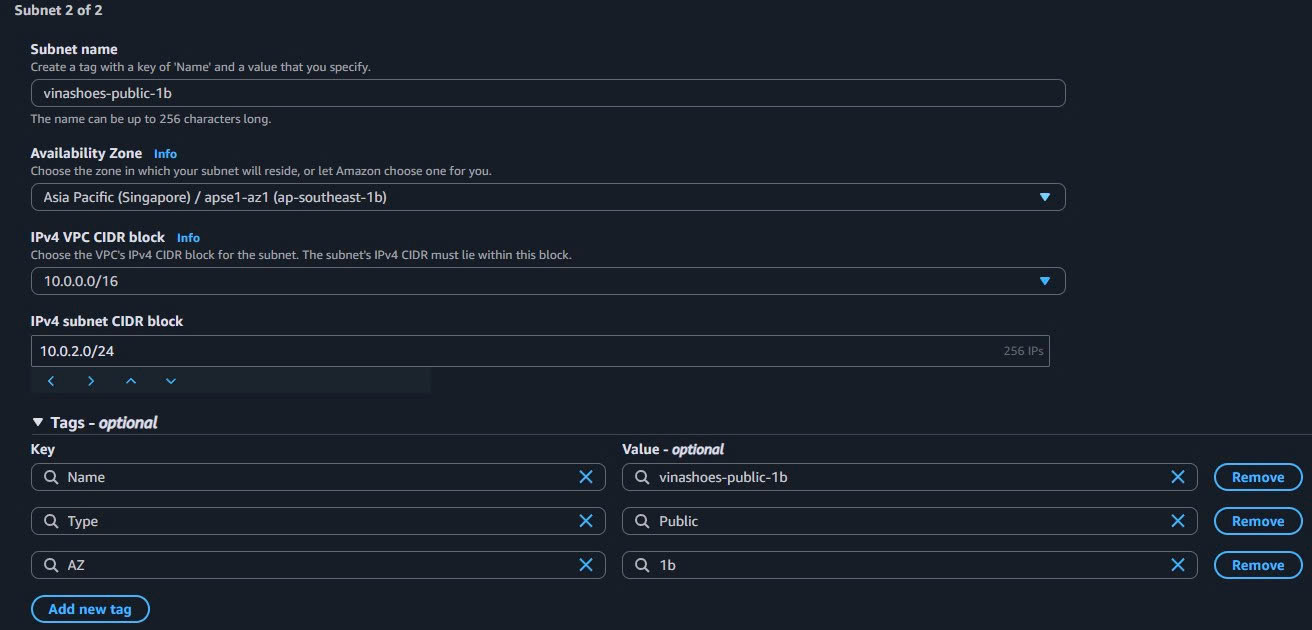
- Public Subnet 1b:
- Subnet name:
vinashoes-public-1b - Availability Zone: ap-southeast-1b
- IPv4 CIDR block:
10.0.2.0/24 - Tags: Type=
Public, AZ=1b
- Subnet name:
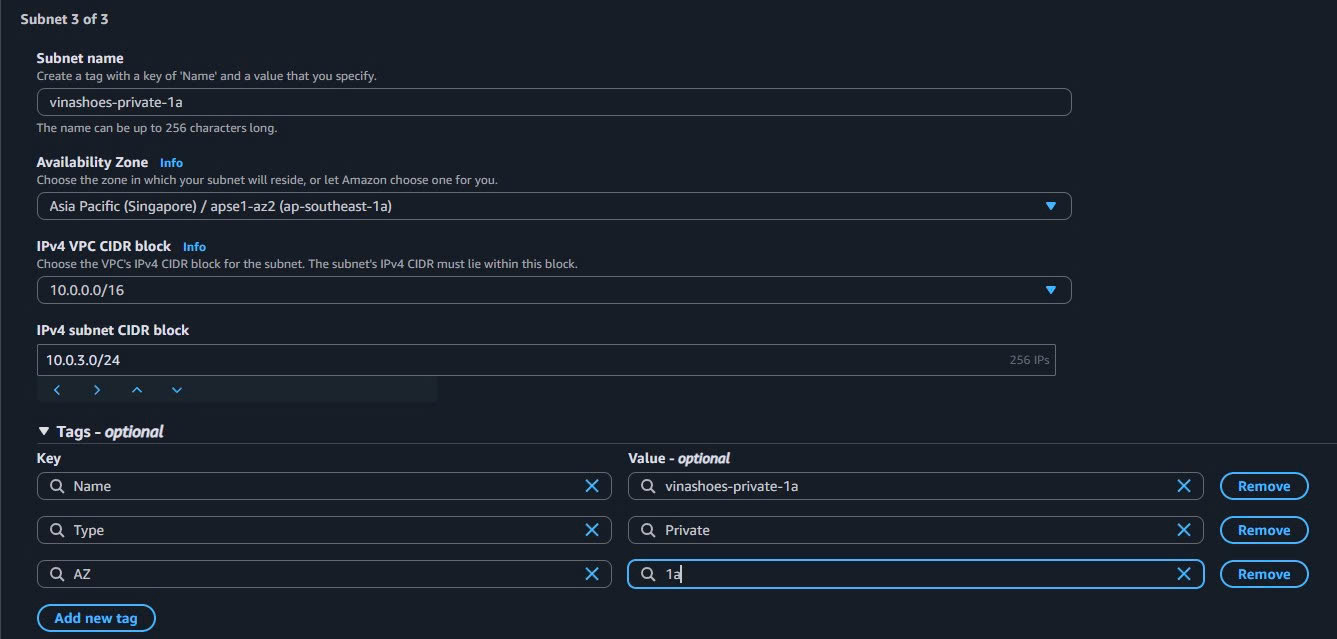
- Private Subnet 1a:
- Click “Add new subnet”
- Subnet name:
vinashoes-private-1a - Availability Zone: ap-southeast-1a
- IPv4 CIDR block:
10.0.3.0/24 - Tags: Type=
Private, AZ=1a
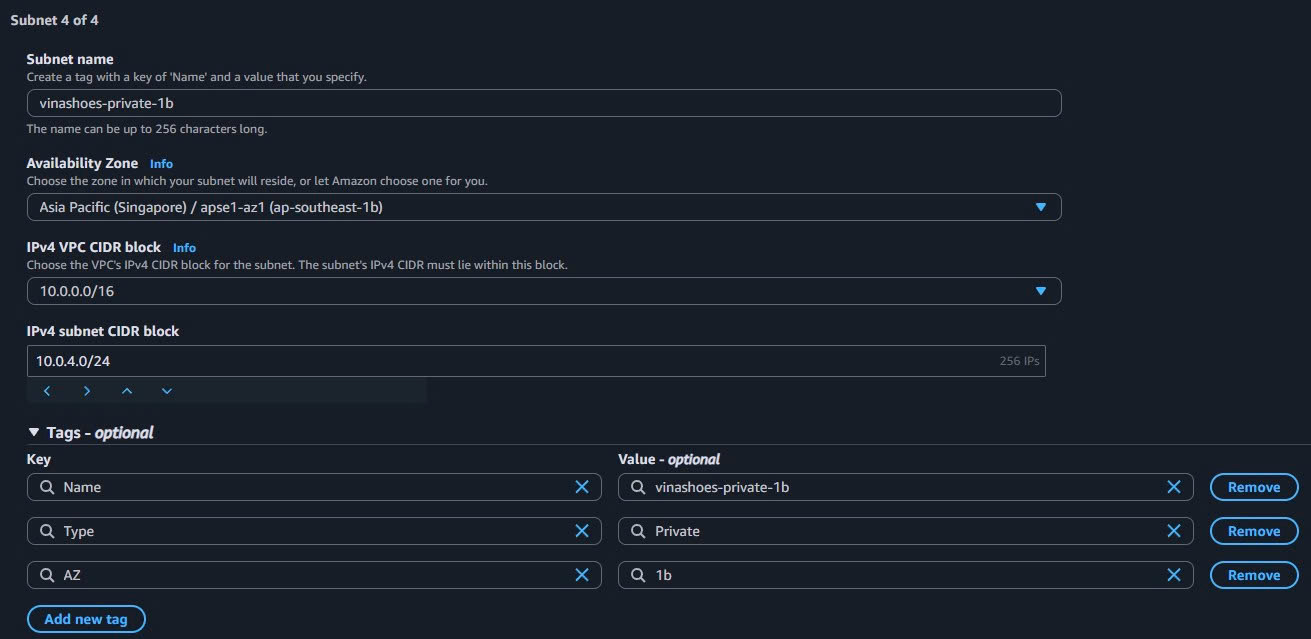
- Private Subnet 1b:
- Click “Add new subnet”
- Subnet name:
vinashoes-private-1b - Availability Zone: ap-southeast-1b
- IPv4 CIDR block:
10.0.4.0/24 - Tags: Type=
Private, AZ=1b
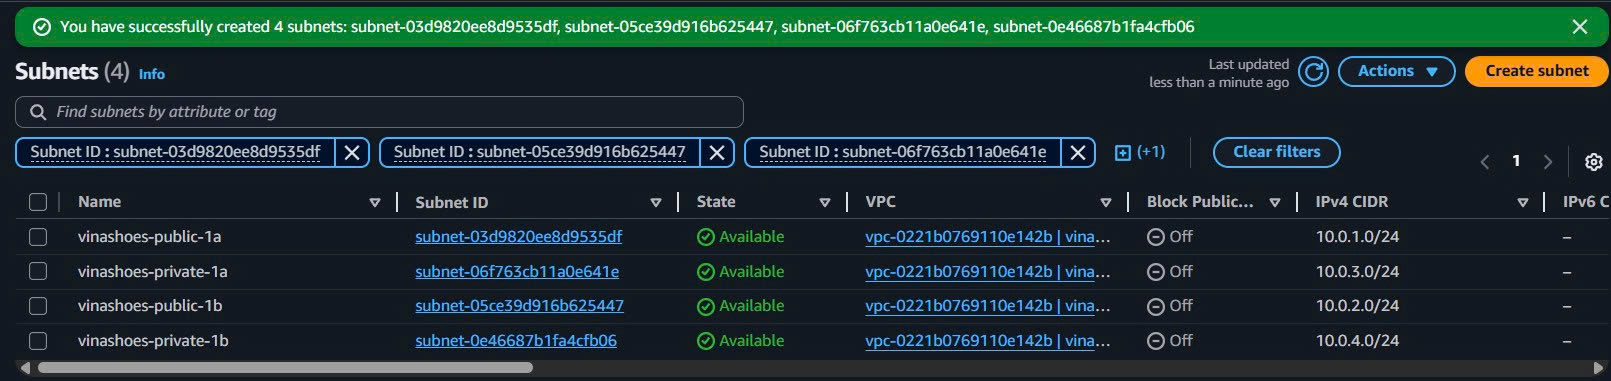
- Create All Subnets:
- Review all 4 subnets
- Click “Create subnet”
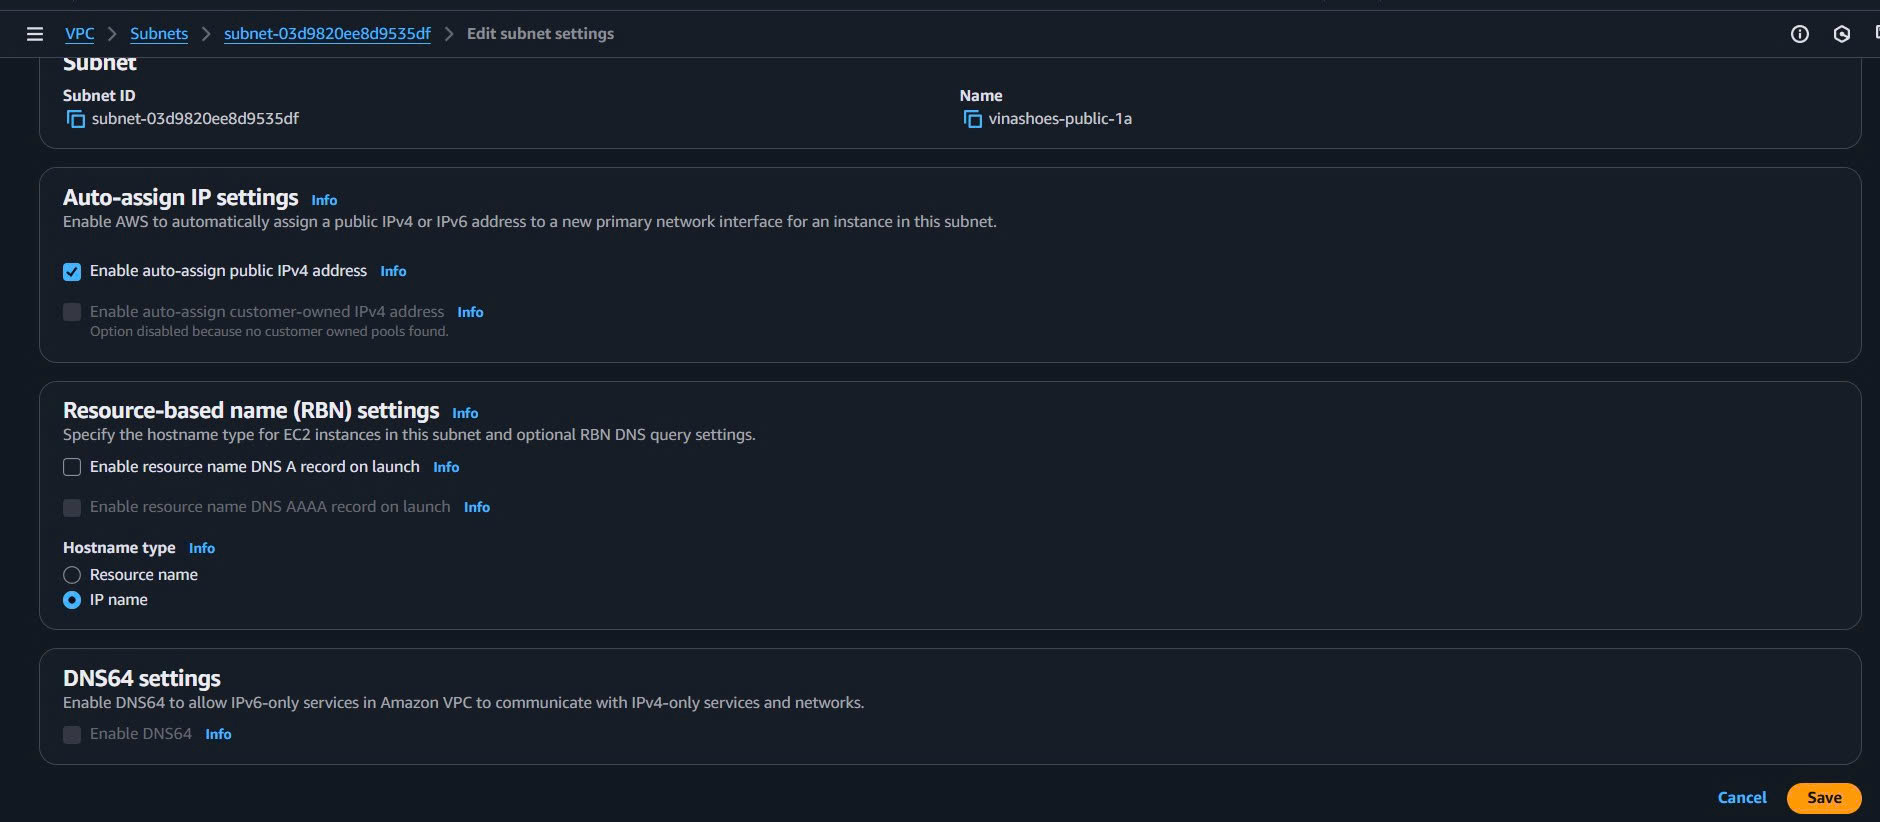
- Enable Auto-assign Public IP cho Public Subnets:
- Select
vinashoes-public-1a→ Actions → Edit subnet settings - ✅ Enable auto-assign public IPv4 address → Save
- Repeat cho
vinashoes-public-1b
- Select
CLI Alternative:
# Create public subnets
aws ec2 create-subnet --vpc-id $VPC_ID --cidr-block 10.0.1.0/24 --availability-zone ap-southeast-1a \
  --tag-specifications 'ResourceType=subnet,Tags=[{Key=Name,Value=vinashoes-public-1a},{Key=Type,Value=Public}]'
export PUBLIC_SUBNET_1A=subnet-xxxxxxxxxxxxxxxxx

aws ec2 create-subnet --vpc-id $VPC_ID --cidr-block 10.0.2.0/24 --availability-zone ap-southeast-1b \
  --tag-specifications 'ResourceType=subnet,Tags=[{Key=Name,Value=vinashoes-public-1b},{Key=Type,Value=Public}]'
export PUBLIC_SUBNET_1B=subnet-xxxxxxxxxxxxxxxxx

# Create private subnets
aws ec2 create-subnet --vpc-id $VPC_ID --cidr-block 10.0.3.0/24 --availability-zone ap-southeast-1a \
  --tag-specifications 'ResourceType=subnet,Tags=[{Key=Name,Value=vinashoes-private-1a},{Key=Type,Value=Private}]'
export PRIVATE_SUBNET_1A=subnet-xxxxxxxxxxxxxxxxx

aws ec2 create-subnet --vpc-id $VPC_ID --cidr-block 10.0.4.0/24 --availability-zone ap-southeast-1b \
  --tag-specifications 'ResourceType=subnet,Tags=[{Key=Name,Value=vinashoes-private-1b},{Key=Type,Value=Private}]'
export PRIVATE_SUBNET_1B=subnet-xxxxxxxxxxxxxxxxx

# Enable auto-assign public IP
aws ec2 modify-subnet-attribute --subnet-id $PUBLIC_SUBNET_1A --map-public-ip-on-launch
aws ec2 modify-subnet-attribute --subnet-id $PUBLIC_SUBNET_1B --map-public-ip-on-launch
4.2.2. Verify Subnet Configuration
Console Verification:
- Subnet List View:
- VPC Console → Subnets
- Filter by VPC: vinashoes-vpc-prod
- Verify 4 subnets với correct CIDR và AZ distribution

- Subnet Details Check:
- Click vào từng subnet để check:
- Public subnets: Auto-assign public IP = Yes
- Private subnets: Auto-assign public IP = No
- All subnets: Proper tags và CIDR blocks
- Click vào từng subnet để check:

- Resource Map Visualization:
- VPC Dashboard → Resource map
- Verify subnet distribution across AZs
CLI Verification:
# List all subnets trong VPC
aws ec2 describe-subnets \
  --filters "Name=vpc-id,Values=$VPC_ID" \
  --query 'Subnets[*].[SubnetId,CidrBlock,AvailabilityZone,MapPublicIpOnLaunch,Tags[?Key==`Name`].Value | [0]]' \
  --output table

# Count subnets (should be 4)
aws ec2 describe-subnets --filters "Name=vpc-id,Values=$VPC_ID" --query 'length(Subnets)'
⚠️ Subnet Planning:
- Public Subnets: 10.0.1.0/24 và 10.0.2.0/24 (256 IPs each)
- Private Subnets: 10.0.3.0/24 và 10.0.4.0/24 (256 IPs each)
- Reserved: 10.0.5.0/24 - 10.0.255.0/24 cho future expansion
- Auto-assign public IP: Chỉ enable cho public subnets
🎯 Deliverable 4.2: 4 subnets created across 2 AZs
- 2 Public subnets với auto-assign public IP enabled
- 2 Private subnets trong cùng AZs
- Proper tagging và CIDR allocation
4.3. Tạo Internet Gateway (IGW)
🎯 Objective: Enable internet access cho public subnets qua AWS Console
4.3.1. Create và Attach Internet Gateway
Console Steps:
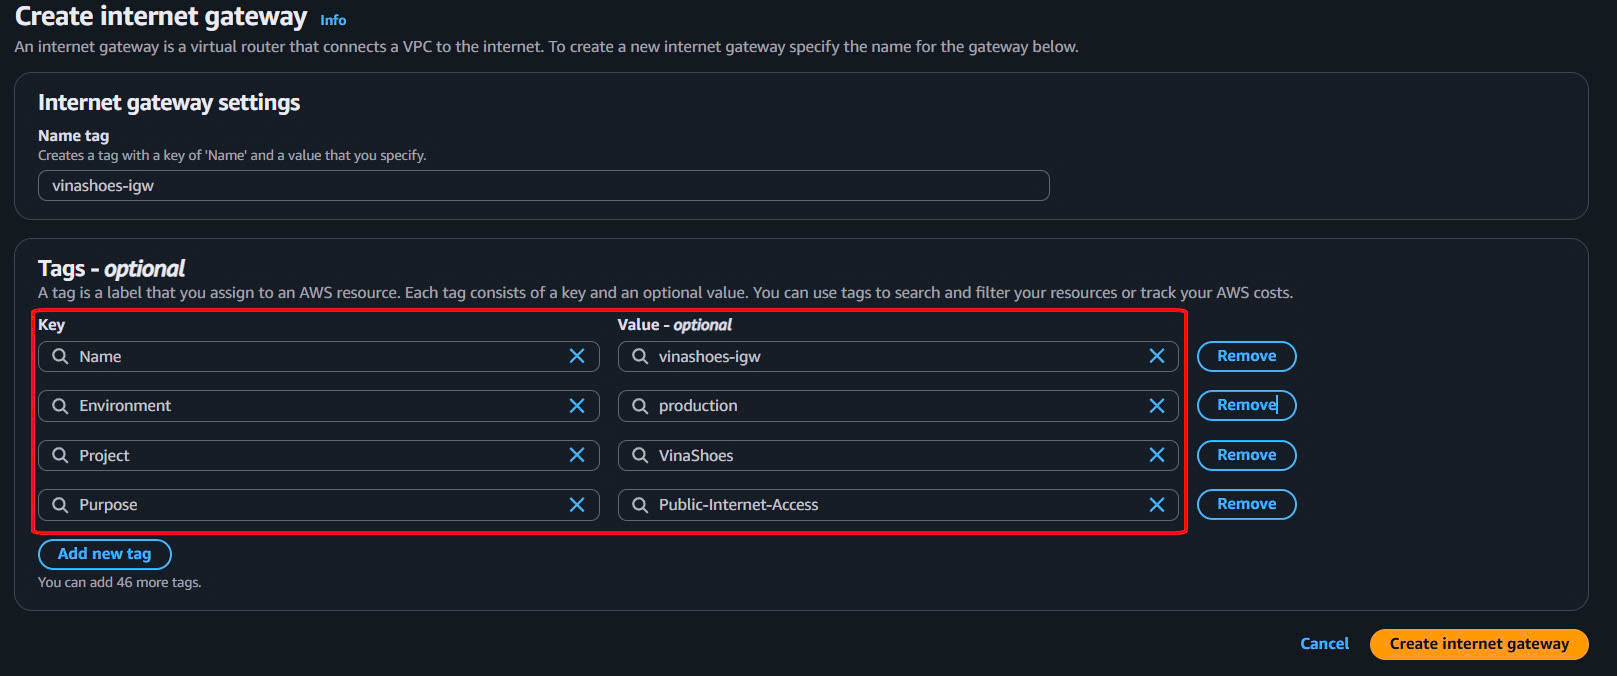
- Create Internet Gateway:
- VPC Console → Internet Gateways → Create internet gateway
- Name tag:
vinashoes-igw - Additional tags:
- Environment:
production - Project:
VinaShoes - Purpose:
Public-Internet-Access
- Environment:
- Click “Create internet gateway”
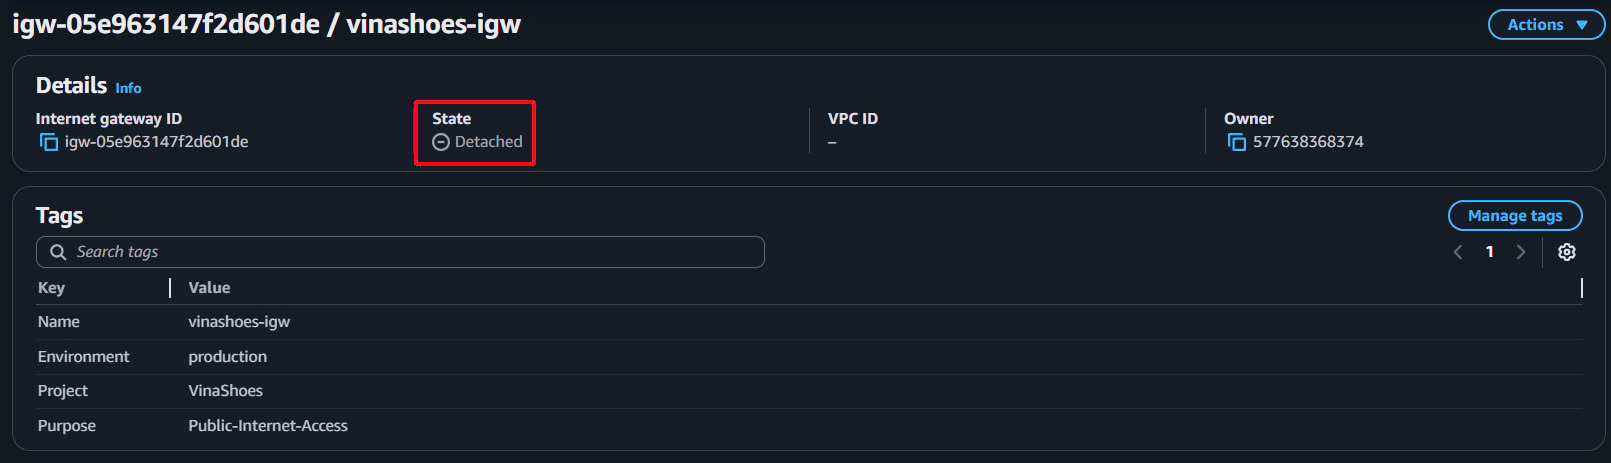
- Check Initial State:
- Sau khi tạo xong, IGW sẽ ở state “Detached”
- IGW cần được attach vào VPC để hoạt động
- Attach to VPC:
- Select
vinashoes-igw→ Actions → Attach to VPC - Select VPC: vinashoes-vpc-prod
- Click “Attach internet gateway”
- Select
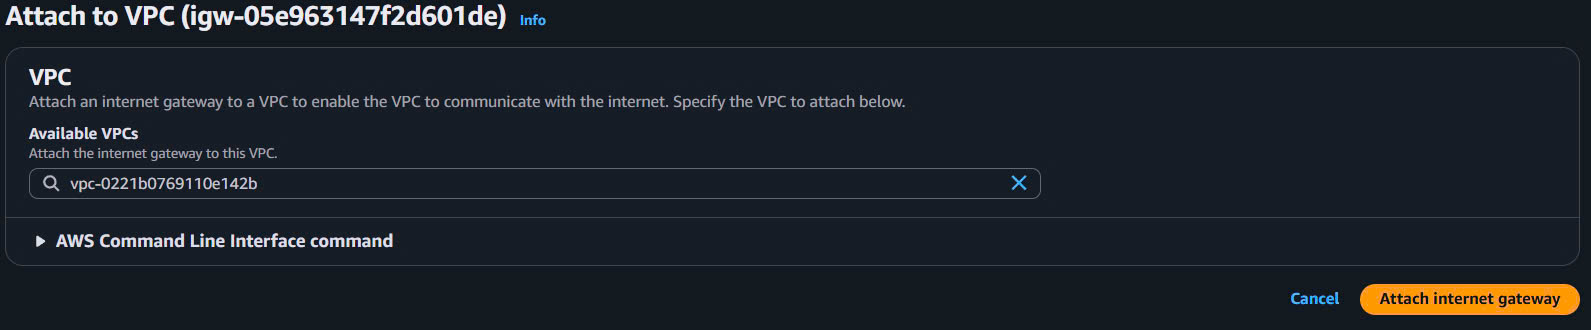
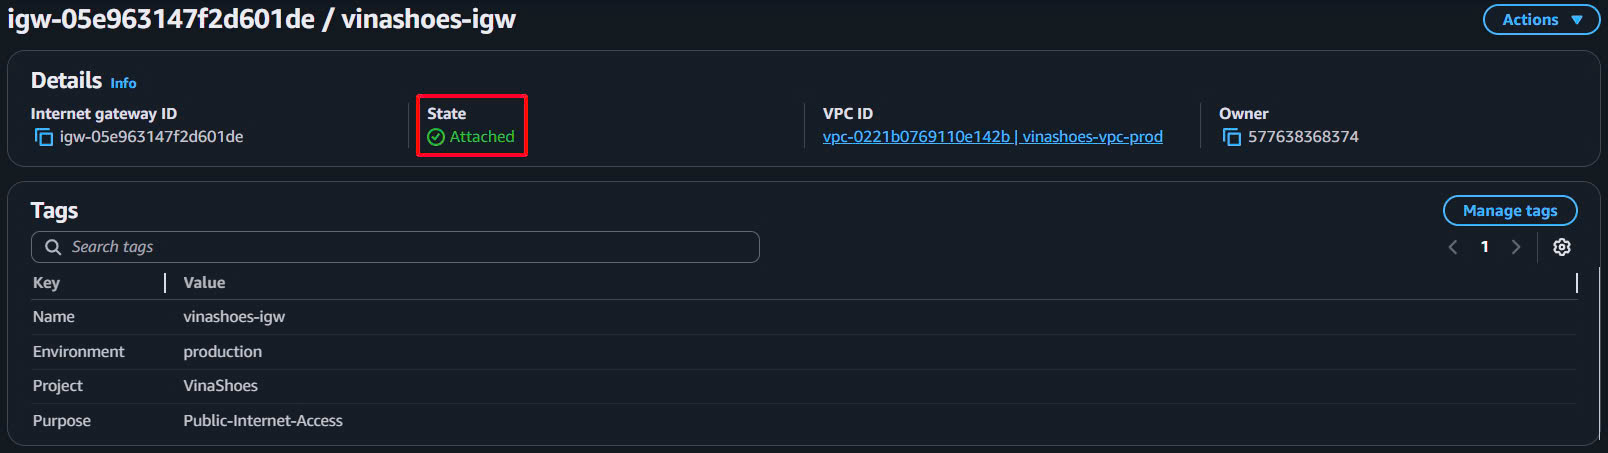
- Verify Attachment:
- Check IGW state: “Attached”
- VPC ID: vinashoes-vpc-prod
- State should be green “Attached”
CLI Alternative:
# Create Internet Gateway
aws ec2 create-internet-gateway \
  --tag-specifications 'ResourceType=internet-gateway,Tags=[{Key=Name,Value=vinashoes-igw},{Key=Environment,Value=production}]'

# Save IGW ID
export IGW_ID=igw-xxxxxxxxxxxxxxxxx

# Attach IGW to VPC
aws ec2 attach-internet-gateway \
  --internet-gateway-id $IGW_ID \
  --vpc-id $VPC_ID

# Verify attachment
aws ec2 describe-internet-gateways \
  --internet-gateway-ids $IGW_ID \
  --query 'InternetGateways[0].[InternetGatewayId,Attachments[0].VpcId,Attachments[0].State]' \
  --output table
💡 Internet Gateway Notes:
- One per VPC: Mỗi VPC chỉ có thể có 1 IGW
- Stateless: IGW không maintain connection state
- Automatic routing: Route traffic dựa trên route tables
- No bandwidth limits: IGW không có bandwidth limitations
🎯 Deliverable 4.3: Internet Gateway attached to VPC
- IGW ID:
igw-xxxxxxxxxxxxxxxxx(save for route tables) - State: Attached
- VPC: vinashoes-vpc-prod
4.4. Tạo Route Tables
🎯 Objective: Setup routing cho public subnets (IGW) và private subnets qua AWS Console
4.4.1. Tạo Public Route Table
Console Steps:
- Create Public Route Table:
- VPC Console → Route Tables → Create route table
- Name:
vinashoes-public-rt - VPC: vinashoes-vpc-prod
- Tags:
- Type:
Public - Environment:
production - Purpose:
Internet-Access
- Type:
- Click “Create route table”

- Add Internet Gateway Route:
- Select
vinashoes-public-rt→ Routes tab → Edit routes - Add route:
- Destination:
0.0.0.0/0 - Target: Internet Gateway →
vinashoes-igw
- Destination:
- Save changes
- Select
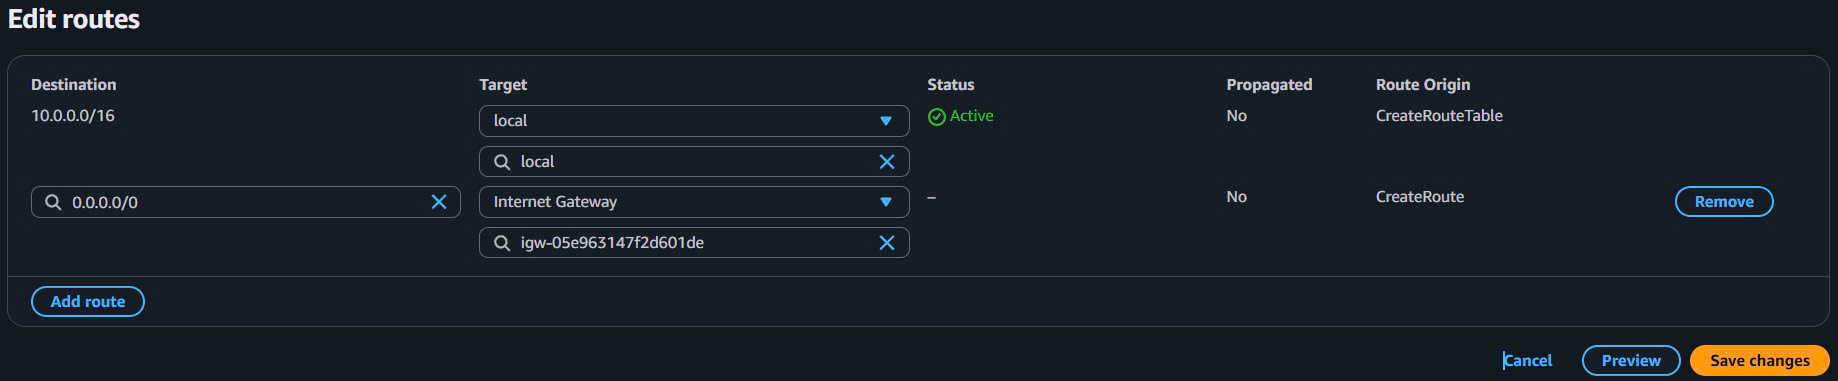
- Verify Default Route:
- Routes tab should show:
10.0.0.0/16→local(automatically added)0.0.0.0/0→igw-xxxxxxxxx(manually added)
- Routes tab should show:

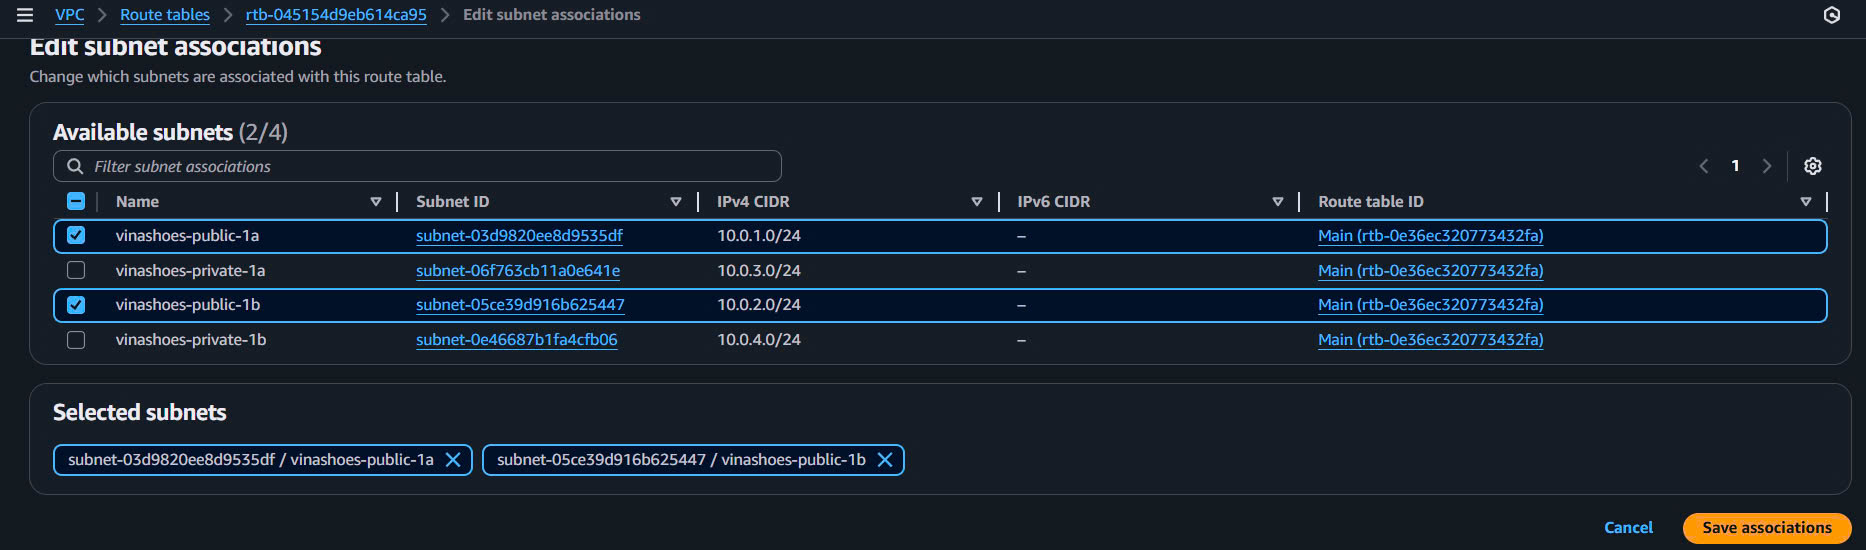
- Associate Public Subnets:
- Subnet associations tab → Edit subnet associations
- Select:
- ✅
vinashoes-public-1a - ✅
vinashoes-public-1b
- ✅
- Save associations
CLI Alternative:
# Create public route table
aws ec2 create-route-table \
  --vpc-id $VPC_ID \
  --tag-specifications 'ResourceType=route-table,Tags=[{Key=Name,Value=vinashoes-public-rt},{Key=Type,Value=Public}]'

export PUBLIC_RT_ID=rtb-xxxxxxxxxxxxxxxxx

# Add default route to IGW
aws ec2 create-route \
  --route-table-id $PUBLIC_RT_ID \
  --destination-cidr-block 0.0.0.0/0 \
  --gateway-id $IGW_ID

# Associate public subnets
aws ec2 associate-route-table --route-table-id $PUBLIC_RT_ID --subnet-id $PUBLIC_SUBNET_1A
aws ec2 associate-route-table --route-table-id $PUBLIC_RT_ID --subnet-id $PUBLIC_SUBNET_1B
4.4.2. Tạo Private Route Tables (Per AZ)
Console Steps cho AZ-1a:
- Create Private Route Table 1a:
- VPC Console → Route Tables → Create route table
- Name:
vinashoes-private-rt-1a - VPC: vinashoes-vpc-prod
- Tags:
- Type:
Private - AZ:
1a - Environment:
production
- Type:
- Click “Create route table”

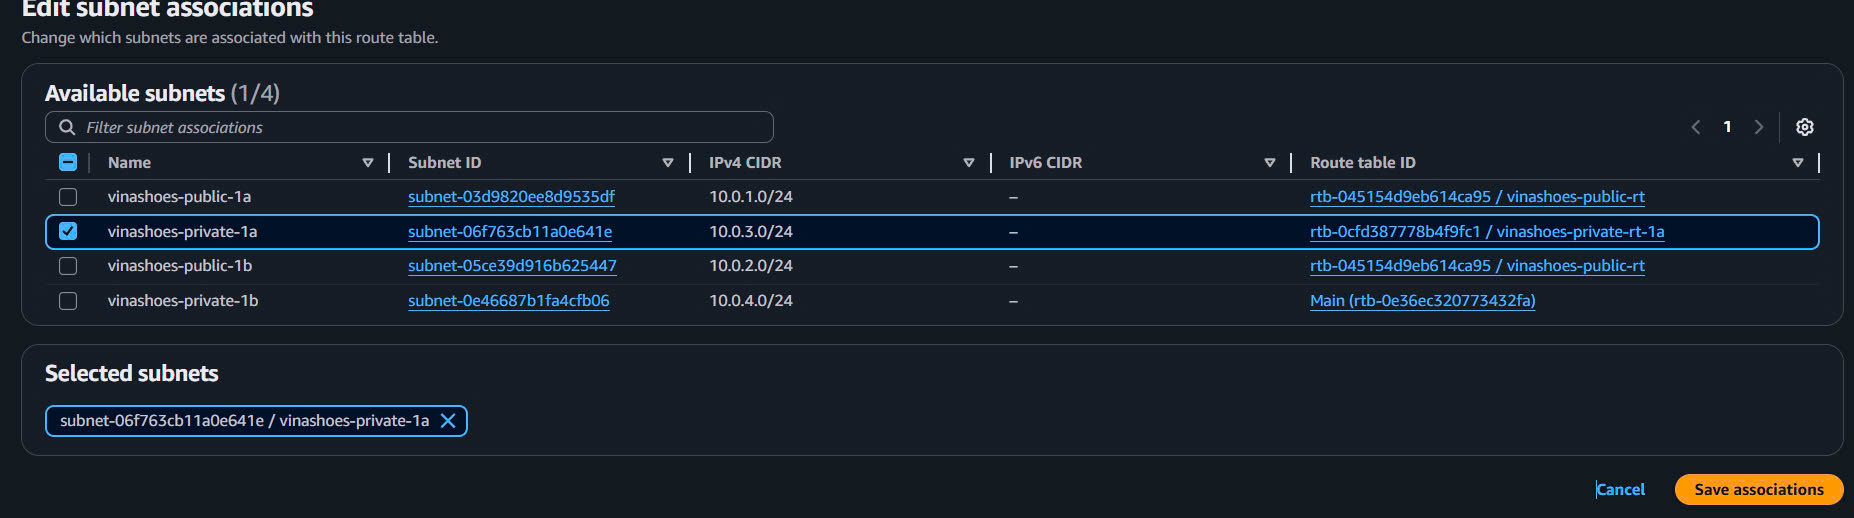
- Associate Private Subnet 1a:
- Select
vinashoes-private-rt-1a - Subnet associations tab → Edit subnet associations
- Select: ✅
vinashoes-private-1a - Save associations
- Select
Console Steps cho AZ-1b: 3. Create Private Route Table 1b:
- Create route table
- Name:
vinashoes-private-rt-1b - VPC: vinashoes-vpc-prod
- Tags:
- Type:
Private - AZ:
1b - Environment:
production
- Type:
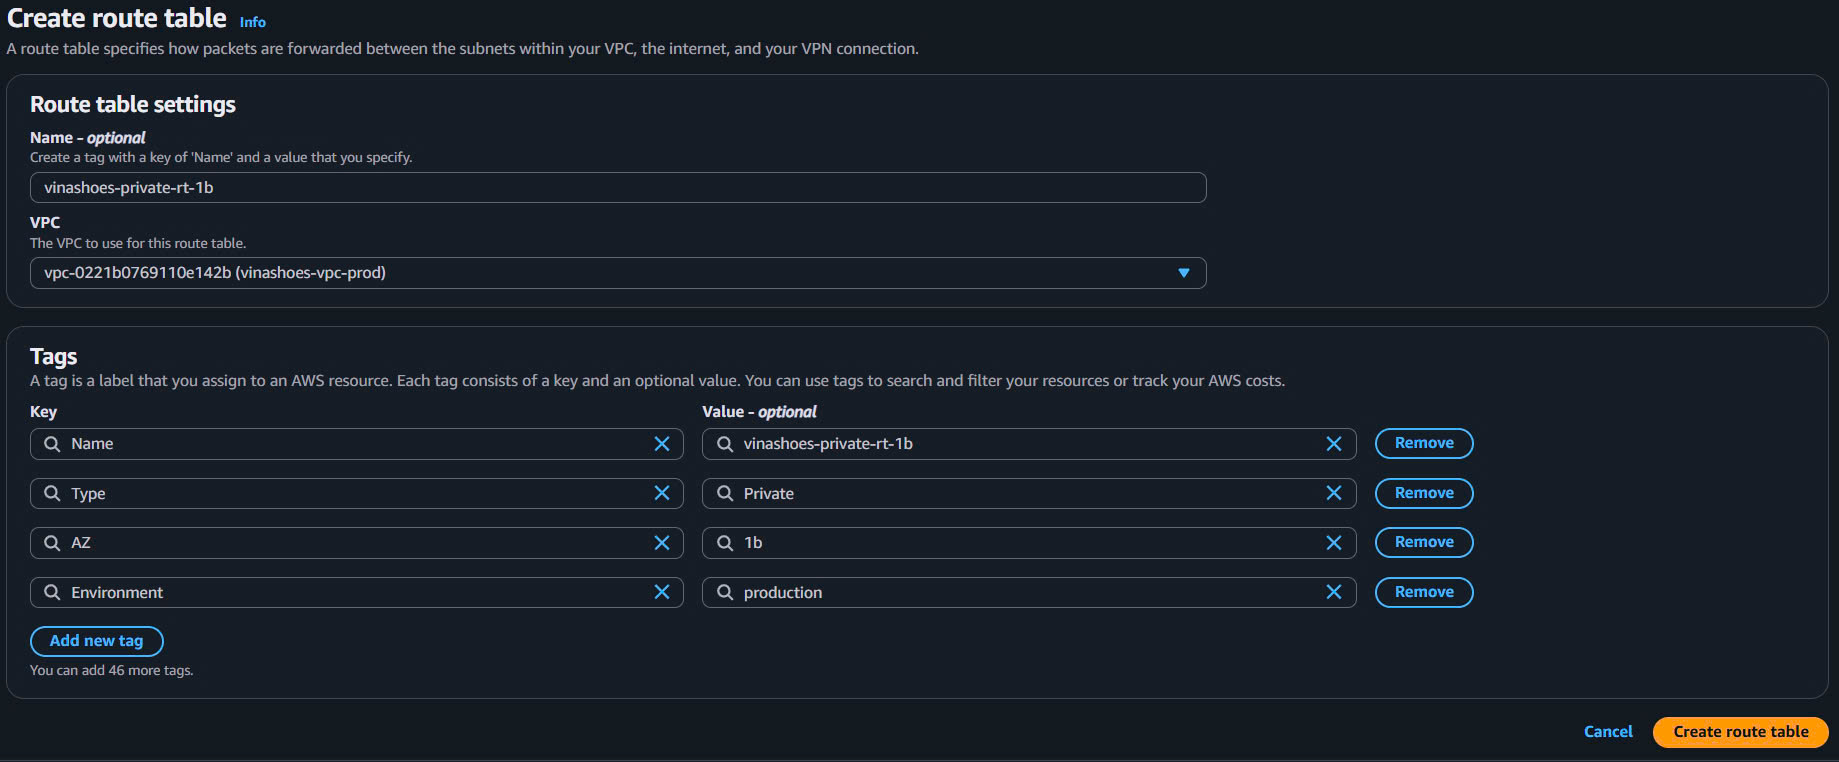
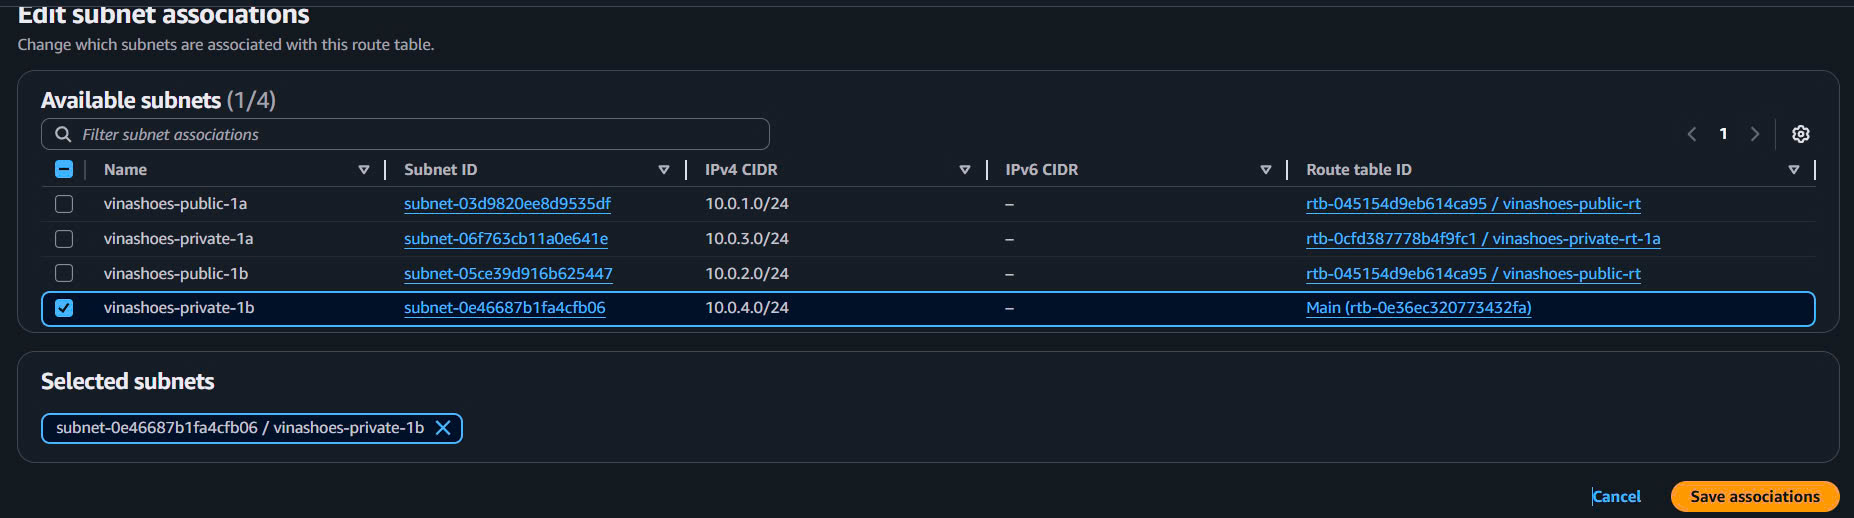
- Associate Private Subnet 1b:
- Select
vinashoes-private-rt-1b - Subnet associations → Edit subnet associations
- Select: ✅
vinashoes-private-1b - Save associations
- Select
CLI Alternative:
# Create private route table for AZ-1a
aws ec2 create-route-table \
  --vpc-id $VPC_ID \
  --tag-specifications 'ResourceType=route-table,Tags=[{Key=Name,Value=vinashoes-private-rt-1a},{Key=Type,Value=Private},{Key=AZ,Value=1a}]'

export PRIVATE_RT_1A=rtb-xxxxxxxxxxxxxxxxx

# Create private route table for AZ-1b
aws ec2 create-route-table \
  --vpc-id $VPC_ID \
  --tag-specifications 'ResourceType=route-table,Tags=[{Key=Name,Value=vinashoes-private-rt-1b},{Key=Type,Value=Private},{Key=AZ,Value=1b}]'

export PRIVATE_RT_1B=rtb-xxxxxxxxxxxxxxxxx

# Associate private subnets
aws ec2 associate-route-table --route-table-id $PRIVATE_RT_1A --subnet-id $PRIVATE_SUBNET_1A
aws ec2 associate-route-table --route-table-id $PRIVATE_RT_1B --subnet-id $PRIVATE_SUBNET_1B
⚠️ Route Table Strategy:
- Public Route Table: Shared cho cả 2 public subnets
- Private Route Tables: Separate per AZ để optimize NAT Gateway routing
- NAT Gateway routes: Sẽ được add trong Task 5
- Local routes: Automatically added cho VPC CIDR (10.0.0.0/16)
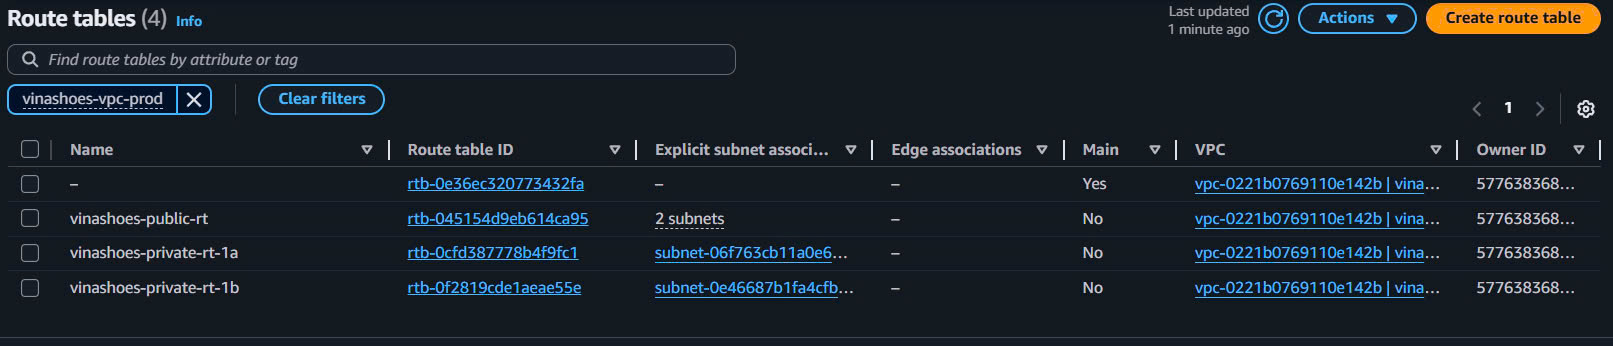
4.4.3. Verify Route Configuration
Console Verification:
- Route Tables Overview:
- VPC Console → Route Tables
- Filter by VPC: vinashoes-vpc-prod
- Should see 4 route tables total:
vinashoes-public-rt(2 subnet associations)vinashoes-private-rt-1a(1 subnet association)vinashoes-private-rt-1b(1 subnet association)default route table(0 associations)
- Public Route Table Verification:
- Select
vinashoes-public-rt→ Routes tab - Should have:
10.0.0.0/16→local0.0.0.0/0→igw-xxxxxxxxx
- Select
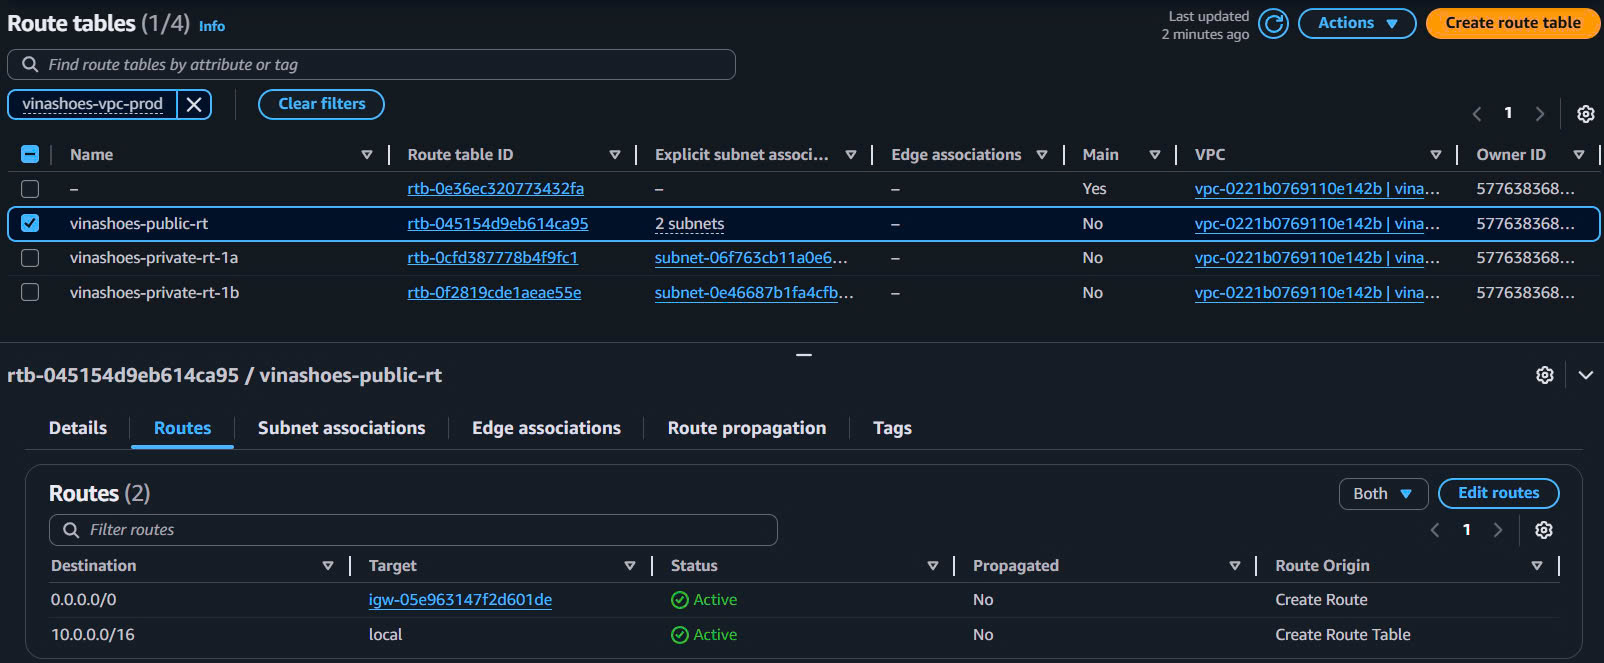
- Private Route Tables Check:
- Both private route tables should only have:
10.0.0.0/16→local(no internet route yet)
- Both private route tables should only have:

- Subnet Associations Check:
- Public RT: 2 public subnets
- Private RT 1a: 1 private subnet (1a)
- Private RT 1b: 1 private subnet (1b)

CLI Verification:
# Check public route table
aws ec2 describe-route-tables \
  --route-table-ids $PUBLIC_RT_ID \
  --query 'RouteTables[0].Routes[*].[DestinationCidrBlock,GatewayId,State]' \
  --output table

# Check private route tables
aws ec2 describe-route-tables \
  --route-table-ids $PRIVATE_RT_1A $PRIVATE_RT_1B \
  --query 'RouteTables[*].[RouteTableId,Routes[*].DestinationCidrBlock]' \
  --output table

# Verify internet route exists
aws ec2 describe-route-tables --route-table-ids $PUBLIC_RT_ID \
  --query 'RouteTables[0].Routes[?DestinationCidrBlock==`0.0.0.0/0`].GatewayId' \
  --output text
🎯 Deliverable 4.4: Route tables configured với IGW access cho public subnets
- Public route table: có route 0.0.0.0/0 → Internet Gateway
- 2 Private route tables: ready cho NAT Gateway routes (Task 5)
- All subnets properly associated
4.5. Tạo Security Groups Foundation
🎯 Objective: Setup security groups cho ECS Fargate và VPC endpoints qua AWS Console
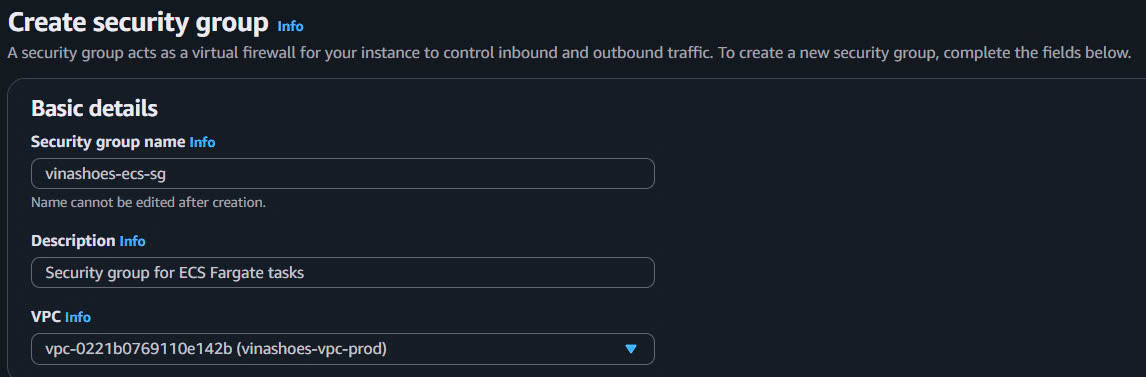
4.5.1. Security Group cho ECS Fargate
Console Steps:
- Create ECS Security Group:
- VPC Console → Security Groups → Create security group
- Security group name:
vinashoes-ecs-sg - Description:
Security group for ECS Fargate tasks - VPC: vinashoes-vpc-prod
- Configure Inbound Rules:
- Inbound rules section:
- Type: Custom TCP
- Port range:
3000 - Source: Custom (10.0.0.0/16) - VPC CIDR
- Description:
HTTP from VPC for ECS Fargate
- Inbound rules section:

⚠️ IPv4/IPv6 CIDR Issue: Nếu gặp lỗi “You may not specify an IPv4 CIDR for an existing IPv6 CIDR rule”:
- Delete existing rule nếu có rule IPv6 conflicts
- Create new rule với Source type = Custom IPv4 (không phải IPv6)
- Nhập CIDR:
10.0.0.0/16(đảm bảo chọn IPv4, không phải IPv6) - Best practice: Sẽ thay bằng ALB Security Group reference trong Task sau
Note: ALB Security Group sẽ được tạo trong Task sau. Hiện tại để Source empty, sẽ update sau khi có ALB SG.
- Configure Outbound Rules:
- Keep default outbound rules:
- Type: All traffic
- Protocol: All
- Port range: All
- Destination:
0.0.0.0/0 - Description:
All outbound traffic to internet via NAT Gateway
- Keep default outbound rules:

- Add Tags:
- Purpose:
ECS-Fargate - Environment:
production - Application:
VinaShoes
- Purpose:

- Create Security Group
CLI Alternative:
# Create ECS security group
aws ec2 create-security-group \
  --group-name vinashoes-ecs-sg \
  --description "Security group for ECS Fargate tasks" \
  --vpc-id $VPC_ID \
  --tag-specifications 'ResourceType=security-group,Tags=[{Key=Name,Value=vinashoes-ecs-sg},{Key=Purpose,Value=ECS-Fargate}]'

export ECS_SG_ID=sg-xxxxxxxxxxxxxxxxx

# Add inbound rule for HTTP traffic from VPC
aws ec2 authorize-security-group-ingress \
  --group-id $ECS_SG_ID \
  --protocol tcp \
  --port 3000 \
  --cidr 10.0.0.0/16

# Outbound rules (default allows all outbound)
# Will update inbound rules later when ALB SG is created
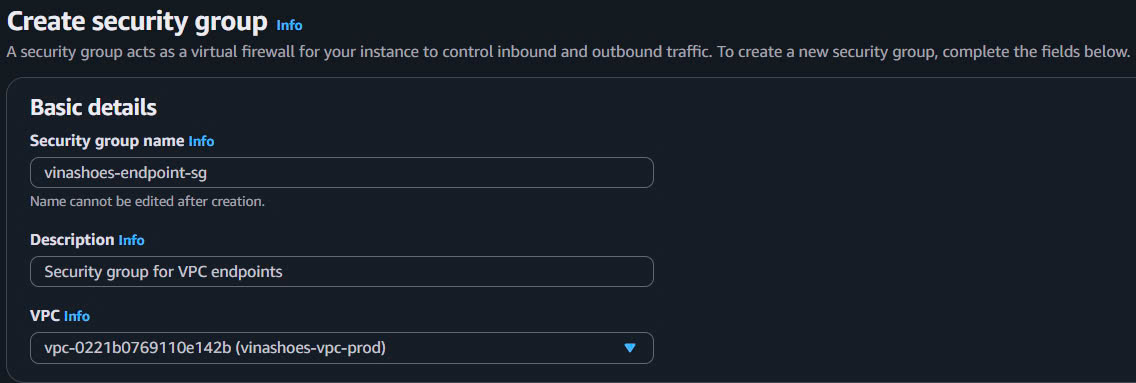
4.5.2. Security Group cho VPC Endpoints
Console Steps:
- Create VPC Endpoint Security Group:
- VPC Console → Security Groups → Create security group
- Security group name:
vinashoes-endpoint-sg - Description:
Security group for VPC endpoints - VPC: vinashoes-vpc-prod
- Configure Inbound Rules:
- Add inbound rule:
- Type: HTTPS
- Port range:
443 - Source: Security Group →
vinashoes-ecs-sg - Description:
HTTPS from ECS tasks
- Add inbound rule:

- Configure Outbound Rules:
- Keep default outbound rules:
- Type: All traffic
- Protocol: All
- Port range: All
- Destination:
0.0.0.0/0
- Keep default outbound rules:

- Add Tags:
- Purpose:
VPC-Endpoints - Environment:
production - Application:
VinaShoes
- Purpose:

- Create Security Group
CLI Alternative:
# Create VPC endpoint security group
aws ec2 create-security-group \
  --group-name vinashoes-endpoint-sg \
  --description "Security group for VPC endpoints" \
  --vpc-id $VPC_ID \
  --tag-specifications 'ResourceType=security-group,Tags=[{Key=Name,Value=vinashoes-endpoint-sg},{Key=Purpose,Value=VPC-Endpoints}]'

export ENDPOINT_SG_ID=sg-xxxxxxxxxxxxxxxxx

# Allow HTTPS from ECS security group
aws ec2 authorize-security-group-ingress \
  --group-id $ENDPOINT_SG_ID \
  --protocol tcp \
  --port 443 \
  --source-group $ECS_SG_ID
💡 Security Group Best Practices:
- Principle of least privilege: Chỉ allow traffic cần thiết
- Use security group references: Thay vì CIDR khi có thể
- Document rules: Add descriptions cho mỗi rule
- Separate by function: ECS và Endpoints có SG riêng
- Regular review: Audit security groups quarterly
4.5.3. Verify Security Groups
Console Verification:
- Security Groups List:
- VPC Console → Security Groups
- Filter by VPC: vinashoes-vpc-prod
- Should see 4 total security groups:
vinashoes-ecs-sg(custom)vinashoes-endpoint-sg(custom)default(VPC default SG)

-
Security Group Details Check:
- Click vào
vinashoes-ecs-sg:- Inbound: Custom TCP 3000 from VPC CIDR (10.0.0.0/16)
- Outbound: All traffic to 0.0.0.0/0
💡 Troubleshooting Security Group Rules:
- Nếu không thấy rule: Check IPv4 vs IPv6 tab trong Console
- Nếu gặp CIDR conflicts: Delete conflicting rules trước khi add mới
- Best practice: Sử dụng Security Group references thay vì CIDR khi có thể
- Testing: Có thể tạm dùng
0.0.0.0/0để test, sau đó restrict lại
- Click vào
- Click vào
vinashoes-endpoint-sg:- Inbound: HTTPS 443 from vinashoes-ecs-sg
- Outbound: All traffic to 0.0.0.0/0
- Security Group Dependencies:
- VPC Dashboard → Security group dependencies
- Visualize security group relationships
CLI Verification:
# List all security groups trong VPC
aws ec2 describe-security-groups \
  --filters "Name=vpc-id,Values=$VPC_ID" \
  --query 'SecurityGroups[*].[GroupId,GroupName,Description]' \
  --output table

# Check security group count (should be 3: 2 custom + 1 default)
aws ec2 describe-security-groups --filters "Name=vpc-id,Values=$VPC_ID" --query 'length(SecurityGroups)'

# Verify security group rules
aws ec2 describe-security-groups --group-ids $ECS_SG_ID $ENDPOINT_SG_ID --output table
🎯 Deliverable 4.5: Security groups foundation ready cho ECS và VPC endpoints
- ECS Security Group: sẵn sàng cho port 3000 traffic từ ALB
- VPC Endpoint Security Group: cho DynamoDB và S3 endpoints
- Proper tagging và documentation
Network Testing và Validation
4.6. VPC Configuration Validation
🎯 Objective: Validate toàn bộ VPC setup qua Console và CLI
4.6.1. Console Validation Checklist
VPC Dashboard Overview:
-
Navigate to VPC Dashboard:
- VPC Console → VPC Dashboard
- Select VPC: vinashoes-vpc-prod
-
Verify Resource Count:
Expected Resources: ✅ 1 VPC (vinashoes-vpc-prod) ✅ 4 Subnets (2 public, 2 private) ✅ 1 Internet Gateway (vinashoes-igw) ✅ 4 Route Tables (1 public, 2 private, 1 default) ✅ 3 Security Groups (ECS, Endpoint, Default) ✅ 0 NAT Gateways (will create in Task 5) -
Resource Map Visualization:
- VPC Dashboard → Resource map
- Verify network topology matches architecture diagram
4.6.2. Comprehensive CLI Test
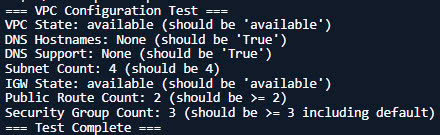
Automated Validation Script:
# Test script to validate VPC setup
cat << 'EOF' > test-vpc-setup.sh
#!/bin/bash

echo "=== VPC Configuration Test ==="

# Test VPC exists and has DNS features
VPC_STATE=$(aws ec2 describe-vpcs --vpc-ids $VPC_ID --query 'Vpcs[0].State' --output text)
DNS_HOSTNAMES=$(aws ec2 describe-vpcs --vpc-ids $VPC_ID --query 'Vpcs[0].DnsHostnames' --output text)
DNS_SUPPORT=$(aws ec2 describe-vpcs --vpc-ids $VPC_ID --query 'Vpcs[0].DnsSupport' --output text)

echo "VPC State: $VPC_STATE (should be 'available')"
echo "DNS Hostnames: $DNS_HOSTNAMES (should be 'True')"
echo "DNS Support: $DNS_SUPPORT (should be 'True')"

# Test subnet count
SUBNET_COUNT=$(aws ec2 describe-subnets --filters "Name=vpc-id,Values=$VPC_ID" --query 'length(Subnets)')
echo "Subnet Count: $SUBNET_COUNT (should be 4)"

# Test IGW attachment
IGW_STATE=$(aws ec2 describe-internet-gateways --internet-gateway-ids $IGW_ID --query 'InternetGateways[0].Attachments[0].State' --output text)
echo "IGW State: $IGW_STATE (should be 'available')"

# Test route tables
PUBLIC_ROUTES=$(aws ec2 describe-route-tables --route-table-ids $PUBLIC_RT_ID --query 'length(RouteTables[0].Routes)')
echo "Public Route Count: $PUBLIC_ROUTES (should be >= 2)"

# Test security groups
SG_COUNT=$(aws ec2 describe-security-groups --filters "Name=vpc-id,Values=$VPC_ID" --query 'length(SecurityGroups)')
echo "Security Group Count: $SG_COUNT (should be >= 3 including default)"

echo "=== Test Complete ==="
EOF

chmod +x test-vpc-setup.sh
./test-vpc-setup.sh
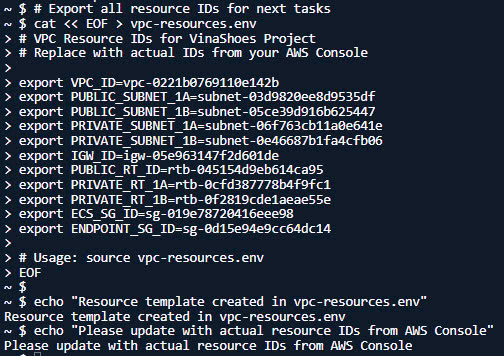
4.6.3. Resource Inventory Export
Create Resource Reference File:
# Export all resource IDs for next tasks
cat << EOF > vpc-resources.env
# VPC Resource IDs for VinaShoes Project
# Replace with actual IDs from your AWS Console

export VPC_ID=vpc-xxxxxxxxxxxxxxxxx
export PUBLIC_SUBNET_1A=subnet-xxxxxxxxxxxxxxxxx
export PUBLIC_SUBNET_1B=subnet-xxxxxxxxxxxxxxxxx
export PRIVATE_SUBNET_1A=subnet-xxxxxxxxxxxxxxxxx
export PRIVATE_SUBNET_1B=subnet-xxxxxxxxxxxxxxxxx
export IGW_ID=igw-xxxxxxxxxxxxxxxxx
export PUBLIC_RT_ID=rtb-xxxxxxxxxxxxxxxxx
export PRIVATE_RT_1A=rtb-xxxxxxxxxxxxxxxxx
export PRIVATE_RT_1B=rtb-xxxxxxxxxxxxxxxxx
export ECS_SG_ID=sg-xxxxxxxxxxxxxxxxx
export ENDPOINT_SG_ID=sg-xxxxxxxxxxxxxxxxx

# Usage: source vpc-resources.env
EOF

echo "Resource template created in vpc-resources.env"
echo "Please update with actual resource IDs from AWS Console"
Troubleshooting Common Issues
⚠️ Security Group IPv4/IPv6 CIDR Conflicts
Problem: Error “You may not specify an IPv4 CIDR for an existing IPv6 CIDR rule”
Root Cause: Trying to add IPv4 CIDR (10.0.0.0/16) to a rule that was created as IPv6 by default.
Solution Steps:
-
Identify the conflicting rule:
- Go to Security Groups →
vinashoes-ecs-sg→ Inbound rules - Look for any existing rules that might be IPv6
- Go to Security Groups →
-
Delete the conflicting rule:
# List existing rules to identify the problem aws ec2 describe-security-groups --group-ids $ECS_SG_ID # Delete IPv6 rule if exists (replace rule-id with actual ID) aws ec2 revoke-security-group-ingress \ --group-id $ECS_SG_ID \ --ip-permissions '[{"IpProtocol":"tcp","FromPort":3000,"ToPort":3000,"Ipv6Ranges":[{"CidrIpv6":"::/0"}]}]' -
Create new IPv4 rule correctly:
-
Console Method:
- Add rule → Type: Custom TCP
- Port:
3000 - Source: Custom → ensure it’s IPv4 tab (not IPv6)
- CIDR:
10.0.0.0/16
-
CLI Method:
# Add IPv4 rule correctly
aws ec2 authorize-security-group-ingress \
  --group-id $ECS_SG_ID \
  --protocol tcp \
  --port 3000 \
  --cidr 10.0.0.0/16
-
-
Alternative approaches:
- Test with 0.0.0.0/0: Allow from anywhere temporarily for testing
- Use Security Group reference: Better practice when ALB SG is available
- Specific IP: Use your current public IP for testing
Prevention:
- Always check IPv4/IPv6 tabs in AWS Console
- Use Security Group references instead of CIDR blocks when possible
- Test with broader CIDR first, then restrict gradually
💰 Cost Notes:
- VPC components: Hoàn toàn miễn phí
- Data transfer: Sẽ có cost khi traffic flow qua IGW
- NAT Gateway: Sẽ có cost trong Task 5 (~$45/month)
- VPC Endpoints: Gateway endpoints (S3, DynamoDB) free, Interface endpoints có phí
4.7.2. Future Cost Optimization
# Script to monitor VPC-related costs
cat << 'EOF' > monitor-vpc-costs.sh
#!/bin/bash

echo "=== VPC Cost Monitoring ==="

# Check NAT Gateway costs (will be created in Task 5)
aws ce get-cost-and-usage \
  --time-period Start=2025-08-01,End=2025-08-31 \
  --granularity MONTHLY \
  --metrics BlendedCost \
  --group-by Type=DIMENSION,Key=SERVICE \
  --filter '{"Dimensions":{"Key":"SERVICE","Values":["Amazon Elastic Compute Cloud - Compute"]}}'

# Check data transfer costs
aws ce get-cost-and-usage \
  --time-period Start=2025-08-01,End=2025-08-31 \
  --granularity MONTHLY \
  --metrics BlendedCost \
  --group-by Type=DIMENSION,Key=USAGE_TYPE \
  --filter '{"Dimensions":{"Key":"USAGE_TYPE","Values":["DataTransfer-Out-Bytes"]}}'

echo "=== Monitoring Complete ==="
EOF

chmod +x monitor-vpc-costs.sh
🎉 Task 4 Complete! VPC foundation ready cho Task 5 (NAT Gateway) và Task 8 (ECS Fargate deployment).
Next Steps: Task 5 Preview
💡 Preparation cho Task 5:
- Save vpc-resources.env file để import IDs
- Verify internet connectivity từ public subnets
- Prepare cost monitoring cho NAT Gateway
- Review security group configurations